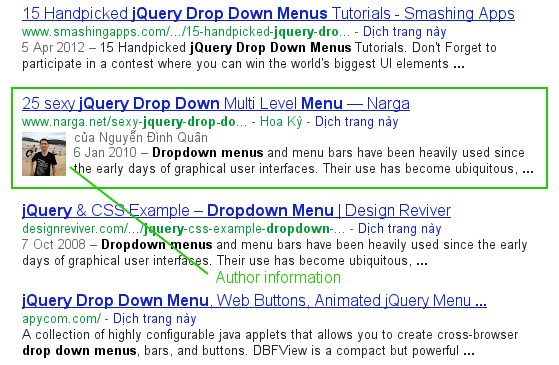
I guess you may have already noticed that Google is showing author information (author’s Google+ profile) in it’s search results. If you haven’t already noticed then check out the sample queries – Matt Cutts, Linus Torvalds or Selena Gomez and Narga.
“Google Authorship” is one way that Google is tweaking the search results in order to improve the searching experience. Google displays the picture of the author right in the search results in order to help users to find great content.

As you can see from the example above, author information helps make your page look more professional with an eye-catching profile photo, your author name, a link to your profile on Google, and a “more articles by so-and-so” link.
How to do your website appearing in Google search results like that? Let’s do it with me!
Requirements
- You owned a website, of course!
- You need a Google account with almost complete Google+ profile information
- A recognizable headshot as your profile photo
There is no guarantee that Google will display your Authorship information. But unless you help Google to figure out who you are, then you have no chance at all!
Unfortunately, Google only chooses to display authorship information if it decides you or the site where you post are authoritative sources. Even if you set up authorship correctly, it can take some time before you see your author icon appear.
The first step in this process is creating your personal profile information on Google+
Regardless of which kind of site you’re claiming authorship for, you must create a Google profile with your real name and a real photo of your face.
- Head over to your Google+ Profile, hover your mouse on profile’s photo then choose Change profile photo, now you can change it to a recognizable headshot photo which will be display on Google Search results.
- On the left hand side of your Google+ Profile page you will find the link to your Profile. Click on it. Now click on Edit Profile. Then scroll down and click on Contributor To. Add the url of your site by clicking on Create Custom Link. After that’s done click on Save and then also click on Done Editing.
Link your content to your Google+ profile using a verified email address.
- Check that you have a email address (such as, [email protected]) on the same domain as your content (wired.com).
- Make sure that each article or post you publish on that domain has a clear byline identifying you as the author (for example, “By Steven Levy” or “Author: Steven Levy”).
- Visit the Authorship page and submit your email address to Google. No matter how many articles or posts you publish on this domain, you only need to do this process once. Your email will appear in the Contributor to section of your Google+ profile. If you want to keep your email private, change the visibility of your link.
- To see what author data Google can extract from your page, use the rich snippets testing tool.
Don’t have an email address on the same domain as your content? Follow the instructions listed below.
- Create a link to your Google+ profile from your webpage, like this:
<a href="[profile_url]?rel=author">Google</a>
Replace
[profile_url]with the your Google+ profile URL, like this:<a href="https://plus.google.com/109412257237874861202? rel=author">Google</a>
Your link must contain the
?rel=authorparameter. If it’s missing, Google won’t be able to associate your content with your Google+ profile. - Add a reciprocal link back from your profile to the site(s) you just updated.
- Edit the Contributor To section.
- In the dialog that appears, click Add custom link, and then enter the website URL.
- If you want, click the drop-down list to specify who can see the link.
- Click Save.
- To see what author data Google can extract from your page, use the rich snippets testing tool.
By doing this, you will see the Author information beside your website in Google search results. For my websites, it took just 1 day to start displaying my details.